Hey there, Swapna at this end. I am here again with our next challenge at Addicted to stamps and more and the challenge is everybody's favorite "Anything goes", click here to visit the challenge post and look what other members have to share.

Showing posts with label sss stamp. Show all posts
Showing posts with label sss stamp. Show all posts
Wednesday, March 18, 2020
Wednesday, March 4, 2020
ATSM - CAS challenge #379
Hey crafty peeps over there, this is Swapna with our latest challenge at Addicted to stamps and more. The challenge is "Clean And Simple". Please go through guide lines for CAS, why i am saying this I,myself have failed many times while submitting my entries here in ATSM in past. 😉

Now coming to my take on the card. Many a times I plan things out and at the end it turns out to be something else. Its one such card. This set was on my wishlist and recently bought it,thought will put it in use.
- I stamped image from Simon says stamp and sentiment from Fiskers with black ink.
- Die cut it with spellbinders die.
- I wanted something to mat but didnt have die so i matted the diecut on grey CS and then cut around it.
- Foam mounted it on the white card base.
- Felt it needed something so i added red colour on lips.
- Thats it, I finished my card.

Do share your suggestions and thoughts on my take to the challenge. Dont forget to enter your card to the challenge and leave some love to the other posts.
Thank you

Wednesday, June 14, 2017
You Matter To Me
Hi.. Hope you are doing well.
Today I over at ColourThrowdown challenge. I am so happy to be featured on their blog this week.
This weeks colour scheme is (i.e. navy, aqua, lime and kraft)
 Now coming to my card.

Its hard to catch shimmer on die cut and flowers.
Thank you for joining with me.
I am entering this card to
Addicted to stamps and more #246

CAS colours & Sketches #227

Inspired by all the little things #60

Muse challenge #220

Today I over at ColourThrowdown challenge. I am so happy to be featured on their blog this week.
This weeks colour scheme is (i.e. navy, aqua, lime and kraft)

- I prepared the front panel using distress inks, sprayed few drops of water and lifted it with dry cloth.
- Clear heat embossed flowers and leaves (SSS stamp) and coloured with zig markers, die cut them out.
- Die cut YOU (SSS die) twice, glued them and applied black wink-of-stella for shimmer. Heat embossed coordinating sentiment on black strip.
- Glued another black strip along the edge of card base, glued the inked panel, arranged flowers and leaves.
- Then glued sentiment.

Its hard to catch shimmer on die cut and flowers.
Thank you for joining with me.
I am entering this card to
Addicted to stamps and more #246

CAS colours & Sketches #227

Inspired by all the little things #60

Muse challenge #220

Tuesday, June 28, 2016
Mini cards - Gift set
Hi..
Here I am with with little different these are small cards.
I usually make 5*7 cards. I like that size and I am comfortable too.
Sometimes make 5.5*4.25. But this set is of mini cards. All card measure 3*3.5 and I loved them all. They will make a nice gift for someone.
Sometimes make 5.5*4.25. But this set is of mini cards. All card measure 3*3.5 and I loved them all. They will make a nice gift for someone.
Set 1 - Made these two with Altenew stamp set.

Set 2 - Used Wplus9 Anenemones

Set 3 - Used pattern paper with stamped sentiment from Sizzix and Your next stamp

Set 4 - Pattern paper with die cut sentiment from Paper tray ink

Set 5 - With Tim holtz stencil and Altenew sentiment and PTI die cut

Set 6 - With SSS stamp

Set 7 - SSS stamp n die

Entering this card to
CAS(E) this sketches

Set 8 - SSS die n Wplus9 stamp

Set 9 - Stampendous stamp

__________________
Supplies
Altenew - Label love, Vintage flower, Beautiful day,
Wplus9 - Water coloured anemones
PTI - Big hugs
Your next stamp - What not sentiments
SSS - Locking hearts
Inks - SSS, Wplus9, Versafine,
Mama elephant - In my heart
PTI - Wet paint cut - 5
Tim holtz - Gothic, Flourish
__________________________________
Entering all these cards to
Ranganjali - June challenge

Addicted to stamps and more
Penny black - Flower power

STAMPlorations - CAS challenge
SSS monday challenge

STAMPlorations - June challenge

Thank you for visiting..
Saturday, April 23, 2016
Stencil - Card
Hi...
Here I am with another card with stencil. Whatever I do, I go back to stencils very often. In past I had made a set of cards using same stencil which can see HERE.
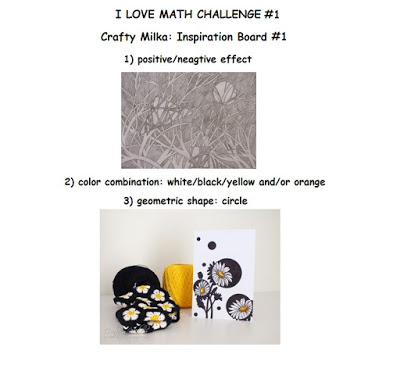
Now coming to this card. I used a water colour paper, created mask by die cutting circle. I needed both -ve and +ve of the mask for card.
Now coming to this card. I used a water colour paper, created mask by die cutting circle. I needed both -ve and +ve of the mask for card.
I placed -ve of the mask over the panel, placed the stencil and blended distress inks. Then i carefully removed -ve mask and placed +ve mask n secured stencil on same place and applied some yellow - orange shades on distress inks.
For sentiment i used SSS circle sentiment, stamped and die cut the sentiment. Used another heart circle stamp, stamped it with black ink and at the centre stamped a heart in yellow n orange inks, die cut it out.
I mounted the stenciled panel on a black CS then this piece on yellow card base with foam tape. Then i mounted circle sentiment and heart circle cut out with foam tape. Applied glossy accent on yellow heart. I needed few more accents for card, so die cut few hearts -applied black wink of stella - then glossy accent. They make really nice embellishments.
Math in the card - Concentric circles have same centre with various radius.


I am entering this card to
Thank you for visiting...
Tuesday, March 1, 2016
Mini album - ICR guest designer (March)
Hi...
Friends...
I am truly honoured to be guest designing for ICR for the month of March.
Here I am with a mini album to share with you all.
Theme of the month was 3D project with flowers but NO CARDS, which took my breath away .
I have not tried anything other than cards till now. So tried mini album. Its an album with two sleets of 12*12 card stack. I decorated it with Papericious - Grey Bloom paper pack. I used mixed stamps to make flowers and the sentiment embellishment.

Outer view of the album

Inside view of the album

The album hold 3 tags and enough space for photos.
Thank you for stopping by
Swapna Patil
Monday, November 9, 2015
Kraft card stock + White pigment ink
Hi...
Here I am with simple and quick cards. I made these cards for Muse challenge .
The inspiration card so fun that I ended up doing two cards with same layout.
For first card I used SSS stamp set. I stamped the half image with Khaki ink and the other half with white pigment ink. Stamped sentiment with memento ink.
The inspiration card so fun that I ended up doing two cards with same layout.
For first card I used SSS stamp set. I stamped the half image with Khaki ink and the other half with white pigment ink. Stamped sentiment with memento ink.
I got inspired by the layout of the inspiration card. The inspiration card had pop of red colour so I used black to pop as my card base was kraft.
The white and khaki colours were subtle so to add another colour I stamped sentiment with black which could stand out yet is in harmony with other colours.
The white and khaki colours were subtle so to add another colour I stamped sentiment with black which could stand out yet is in harmony with other colours.

Made the other card with same design. I used clearly besotted stamp for this.

Thank you for stopping by,...
Swapna patil
Thursday, October 8, 2015
Ink blending - One layer card
Hi...
Friends...
I always struggled to make one layer card.
When ever i tried due to some mistakes I had to make them layered instead of One layer.
But off lately i am making one layer card though I start with a plan of layered card.
This simple card I made by clear heat embossing and over that blending inks.
I used snowflakes stamp foe the background, and used 4 distress inks. Stamped sentiment with versafine black ink. Finished card with few sequins.

** Please suggest me how to position sequins, I always struggle with sequins placement.
I am entering this card to CAS(E) this sketch 143


Also entering the card to Crafty sentiment designs
Suggestions are always welcome...
Thank you for stopping by...
Swapna Patil
Sunday, September 13, 2015
Organisation
Hi friends...
Firstly I want to apologise for such a long post.
Today i have post on boring but very important topic. Every person need some sort of organisation. I was always concerned about organising as i cant work in messy place.
I agree as we start working the area get messy. In my view ORGANISING means, easy to put back the things in their place and finding them easily when you need. If you have to search or break your head to remember were you kept then I am sure you wont use it again and forget about it.
Here is my small effort to share my ideas on organising things, hope you like it.
Organising is not an easy task to accomplish and maintain unless and untill you know what you have and how much place you have. First and formost i categorised what I have? What are my different hobbies so that I can keep the respective items together.
My first concern was my embroidery books, clothe( Matti cloth for Kasuti-Karnataka Kasuti which is the traditional embroidery of Karnataka).
Then came the paper crafting items, items to be organised are more so i categorised them on type like papers, stamps, dies, inks, embellishments.
In this i kept all my embellishments like sequins, enamel dots in one box.
All papers in their repective covers and i have plain 12x12 papers from Reena Gupta and for card base and other purpose I buy in local market (get them cut in printing press, score and fold them which saves lot of time and space).
Then came stamps and dies
Selection of pockets - Here the first thing i did was searching for poskets to store them.
I was not at all convinced by the typical stamp storage pockets which many use. They are costly because they are imported. go for imported if you wont get in local market.
I bought 1kg of plastic covers in local market in which i got nearly 150 covers. I sat and made flaps (sounds crazy but not as crazy as spending lots of money on imported stamp pockets) for them as they wont come with ready flaps. These are 9" long covers so you can adjust the height of the cover ;). For most of the dies i used CD covers.


Then came labelling
Selection of label - I first thought of printing all label on A4 sheet cut them and stick with tixo tape. It didnt work for me. Then i thought of buying label maker but the cost of that and refill made me drop the idea. Then i saw a label sheet on ebay and bought the pack of 100 sheets for 350/- which is lot cheaper(in money wise) than labelling machine and refill. The label is Novajet self adhesive label .


In that i used 84L label. It has instructions inside to type and print labels. I printed labels for dies,stamps, embossing folders.
Ink pads
For ink pads i felt these are perfect labels. If you want you can trim a little bit but they worked fine for me. After attaching labels to ink pads I realised that I forgot to stamp on them with respective colour. So when you want to do this please stamp and them attach. I have not organised them in any particular order. All die, pigments are together exceptions being black n white inkpads.

I have distress mini so i store them in transparent box. along with 4 memento dew drops and few color box chalk inks..

Stamp storage
I was bit worried about storing stamps. Because IF I WONT SEE I WONT USE. So i took this idea from Jennifer McGuiere. I soon realised that the pockets can fit two stamp sets in them. So i placed two sets in one pocket which will help me in future(I already saved lots of space for upcoming stamp sets). For few stamp sets i trimmed the plastic backing they come with so that they can fit in the cover. The few larger stamps i placed one in one pocket. These pockets are right for big sets like Altenew rose/flower sets too.

For sets which had matching dies i made a red dot on the label itself so that i can make out which set has matching die.

I kept smaller stamps like these in cd cover.

For background stamps i didnt do any packing. I just attached the label on their backing sheet.

Die storage
It was bit difficult to store dies for me. First i used to store them with magnetic sheets. As the collection increased it became difficult for me to look at them because of the weight. Then i switched to CD covers. But there were few sets which needed magnetic sheets for them i am using magnetic sheets.

These are the above stamp covers but i trimmed them to the size of 5x6" so that they can fit exactly to the set.

This is the original size of the cover without any further trimming. For dies like these i use magnetic sheets. But i have only two sets like this.

Embossing folders
For embossing folders i didnt do much as they are strong enough to hold themselves. I put the label and thats it.

That is it. This is my organisation. to sum up every thing. Dies and background stamps in one container.

Stamps and embossing folders in another.
Hope you liked it. If you liked please comment bellow.
Thank you for being with me till the end.
Swapna
Subscribe to:
Posts (Atom)