Hello,there Swapna here with new challenge at Happy Little Stampers and the optional theme is Emboss. You can find the details and inspiration HERE.

Showing posts with label Embossing paste. Show all posts
Showing posts with label Embossing paste. Show all posts
Friday, May 1, 2020
Saturday, August 26, 2017
You Make Me So Happy
Hi.. Friends..
Here I am with a new card with Hero arts stencil, i love this stencil. Frame i used for this card is left over from another card which i made a while ago for A Blog Named Hero. I didn't feel like discarding it so made another card.
Here I am with a new card with Hero arts stencil, i love this stencil. Frame i used for this card is left over from another card which i made a while ago for A Blog Named Hero. I didn't feel like discarding it so made another card.
Monday, August 7, 2017
Make A Wish - August challenge
Hi.. Friends..
This month we at A Blog Named Hero are collaborating with Wow Embossing. They have huge collection of embossing powders and price point is awesome.
This month's challenge is EMBOSSING, it can be heat embossing or dry embossing. You can get more inspiration from our team by clicking here
This month we at A Blog Named Hero are collaborating with Wow Embossing. They have huge collection of embossing powders and price point is awesome.
This month's challenge is EMBOSSING, it can be heat embossing or dry embossing. You can get more inspiration from our team by clicking here
Wednesday, December 21, 2016
New year and new step in my Creative life
Hi.. Friends..
I am here to share a news with you all. I am so happy and excited to be part of A Blog Named Hero for 2017. Do visit the site to see my introduction post today.
Here is a teaser

Thank you and suggestions are welcome always..

I am here to share a news with you all. I am so happy and excited to be part of A Blog Named Hero for 2017. Do visit the site to see my introduction post today.
Here is a teaser

Thank you and suggestions are welcome always..
Thursday, July 21, 2016
Stencil love - 3 cards
Hi... Hello..
Crafty friends...
I am Swapna from The Dream Pages, I hope you are playing along this month's challenge which is LAYERS

Hope you are enjoying our blog posts from all fellow DTs. This is my second detail post for this month for PABD and its mainly on STENCILS. Sometimes its tricky to add layers in CAS cards but its fun to challenge yourself to do so. When the post is about stencils then lets talk about these stencils a bit.
These are 8.5*8.5" stencils which allow you to cover larger area so these can be used to make 5*7" cards also and for Mixed media too.
Now coming to my projects
Card 1
I have a small, behind the screen story for this card.
To be frank I was not sure about this card. My fellow Dt Ria have designed this stamp and after July release she asked me 'Did you like Humming blooms' set n particularly bird images? I said liked but I might not do justice with birds so I will use only flourish from the set. Then I thought WHY NOT TRY birds. So decided to make this card.
* My first step was to keep the card base ready, so i took a black top folding card base. I secured the base to my work surface along with stencil. Applied texture paste concentrating towards centre portion of the base. Left it air dry.
* I stamped and coloured the small bird from the set on water colour paper and coloured in rainbow theme. Then fussy cut the image. I used wink of stella for blending colours and to add shimmer to the image
* Heat embossed the custom sentiment on black CS.
* Mounted bird and sentiment with foam tape.

Card 2
I will try my best to explain this card.
* I took 15*7" CS, scored at 5 and 10".
* Partial die cut on each flaps using the stitched oval dies.
* Placed the stencil on one flap and applied SSS lavender ink and on other flap I applied hero arts white pigment ink. While placing the stencil on other flap I made sure the design that the design continues.
* Cut white CS with second large and second small stitched oval die. Stamped image with same SSS ink. Coloured the image with colour pencils. Stamped sentiment with Versafine black onyx ink.
* Glued large oval inside card. Mounted small oval in the front.
Card 3
After doing 2 cards I was thinking to do one more card with our third stencil. Thought to keep it simple.
* Placed the stencil over a white CS. Used two distress inks to blend.
* Trimmed it 0.5 cm on all sides so that it can fit on the card base.
* Stamped the sentiment with black ink. Applied black wink-of-stella for shimmer and Glossy accent for gloss.
* Die cut a heart, applied wink of stella and glossy accent.

Thats it..
Hope you liked my work..
We also have 10% Discount on your purchase through the month of july. Visit PABD site and grab the discount.
Copoun code is SWAPNA_10
I am entering these cards to
Addicted to CAS


CASology 207


Last but not least
The 30 day colouring challenge

Suggestions are always welcome...
Thank you...
Crafty friends...
I am Swapna from The Dream Pages, I hope you are playing along this month's challenge which is LAYERS

Hope you are enjoying our blog posts from all fellow DTs. This is my second detail post for this month for PABD and its mainly on STENCILS. Sometimes its tricky to add layers in CAS cards but its fun to challenge yourself to do so. When the post is about stencils then lets talk about these stencils a bit.
These are 8.5*8.5" stencils which allow you to cover larger area so these can be used to make 5*7" cards also and for Mixed media too.
Now coming to my projects
Card 1
I have a small, behind the screen story for this card.
To be frank I was not sure about this card. My fellow Dt Ria have designed this stamp and after July release she asked me 'Did you like Humming blooms' set n particularly bird images? I said liked but I might not do justice with birds so I will use only flourish from the set. Then I thought WHY NOT TRY birds. So decided to make this card.
* My first step was to keep the card base ready, so i took a black top folding card base. I secured the base to my work surface along with stencil. Applied texture paste concentrating towards centre portion of the base. Left it air dry.
* I stamped and coloured the small bird from the set on water colour paper and coloured in rainbow theme. Then fussy cut the image. I used wink of stella for blending colours and to add shimmer to the image
* Heat embossed the custom sentiment on black CS.
* Mounted bird and sentiment with foam tape.

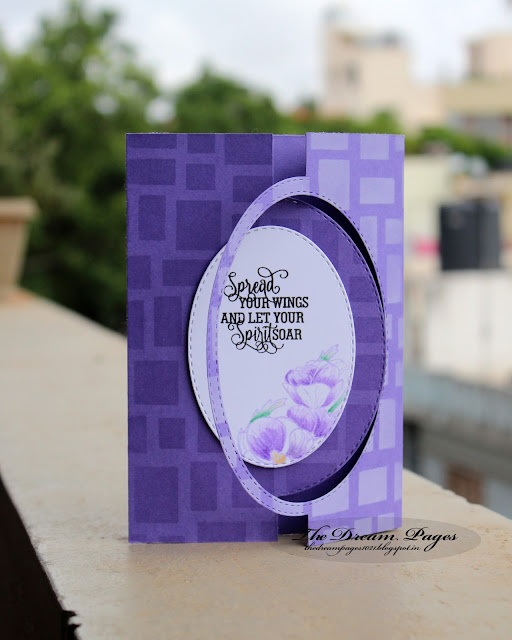
Card 2
I will try my best to explain this card.
* I took 15*7" CS, scored at 5 and 10".
* Partial die cut on each flaps using the stitched oval dies.
* Placed the stencil on one flap and applied SSS lavender ink and on other flap I applied hero arts white pigment ink. While placing the stencil on other flap I made sure the design that the design continues.
* Cut white CS with second large and second small stitched oval die. Stamped image with same SSS ink. Coloured the image with colour pencils. Stamped sentiment with Versafine black onyx ink.
* Glued large oval inside card. Mounted small oval in the front.

Card 3
After doing 2 cards I was thinking to do one more card with our third stencil. Thought to keep it simple.
* Placed the stencil over a white CS. Used two distress inks to blend.
* Trimmed it 0.5 cm on all sides so that it can fit on the card base.
* Stamped the sentiment with black ink. Applied black wink-of-stella for shimmer and Glossy accent for gloss.
* Die cut a heart, applied wink of stella and glossy accent.

Thats it..
Hope you liked my work..
We also have 10% Discount on your purchase through the month of july. Visit PABD site and grab the discount.
Copoun code is SWAPNA_10
I am entering these cards to
Addicted to CAS


The 30 day colouring challenge

Suggestions are always welcome...
Thank you...
Friday, July 1, 2016
Peek-a-boo-designs - First DT post
Hi..
Friends..
I am so happy to share this with you, I am one of the new design team member at Peek-a-boo-designs. Its a new journey in my crafting life.

For my very first post I made two cards with their new stencils.
These stencils are of good quality. What i liked most is size of these stencils. I prefer making 5x7* cards where as the stencils available for cards are smaller. So I was not able to cover entire card front. But these are bigger which can fit a 5x7* card front vertically,horizontally and even diagonally.
Now coming to my cards. I made two cards with their 2 of their stencils.
Card 1
Its a simple 2 colour card. I kept it simple and less colour.
# I placed stencil over a white CS and used hickory smoke ink.
# Then placed stencil over black CS and applied texture paste.
# After texture paste dried, I trimmed the CS so that it matches the design on white CS.
# Stamped sentiment from Magical Fairies with black onyx ink.
# Mounted all panels on each other with foam sheet.

Card 2
As earlier card was monochromatic I thought of making something colourful.
# Placed stencil over a white CS , used distress inks (wild honey, picked rasberry, peacock feathers)
# Then used brand new rectangle stitched dies from PABD. I placed dies randomly on inked panel and die cut it.
# I placed the middle die cut piece upside down and stamped sentiment ( Positive Vibes).
# Mounted these pieces on black CS and then on white card base with foam sheet.

________________________________
Supplies


EDITED INFO - Also they have 10% off on your order through 31st July...
Use code SWAPNA_10
Peek-a-boo designs
Wish to see you again in our new challenge thats LAYERS...
_________________________________________
I am entering these cards to
SSS - Wednesday challenge - Anything goes
BOTH CARDS
Stamplorations challenge - June
BOTH CARDS

SECOND CARD

Addicted to stamps
SECOND CARD

Thank you for your time..
Suggestions are welcome..
Tuesday, June 28, 2016
Mini cards - Gift set
Hi..
Here I am with with little different these are small cards.
I usually make 5*7 cards. I like that size and I am comfortable too.
Sometimes make 5.5*4.25. But this set is of mini cards. All card measure 3*3.5 and I loved them all. They will make a nice gift for someone.
Sometimes make 5.5*4.25. But this set is of mini cards. All card measure 3*3.5 and I loved them all. They will make a nice gift for someone.
Set 1 - Made these two with Altenew stamp set.

Set 2 - Used Wplus9 Anenemones

Set 3 - Used pattern paper with stamped sentiment from Sizzix and Your next stamp

Set 4 - Pattern paper with die cut sentiment from Paper tray ink

Set 5 - With Tim holtz stencil and Altenew sentiment and PTI die cut

Set 6 - With SSS stamp

Set 7 - SSS stamp n die

Entering this card to
CAS(E) this sketches

Set 8 - SSS die n Wplus9 stamp

Set 9 - Stampendous stamp

__________________
Supplies
Altenew - Label love, Vintage flower, Beautiful day,
Wplus9 - Water coloured anemones
PTI - Big hugs
Your next stamp - What not sentiments
SSS - Locking hearts
Inks - SSS, Wplus9, Versafine,
Mama elephant - In my heart
PTI - Wet paint cut - 5
Tim holtz - Gothic, Flourish
__________________________________
Entering all these cards to
Ranganjali - June challenge

Addicted to stamps and more
Penny black - Flower power

STAMPlorations - CAS challenge
SSS monday challenge

STAMPlorations - June challenge

Thank you for visiting..
Monday, May 23, 2016
TCW stencil love continues - Card #3
Hi..
Everyone...
Here i am with my card using the TCW stencil. Here are few cards which i made in past using same stencil.
This time I just plcaed the stencil over a panel and applied embossing paste. Stamped the sentiment with black ink and adhered the panel on a grey card base.

And the card is..

Entering this card to


PS: I selected masculine colour for the card


Thank you for visiting...
Thursday, May 5, 2016
Double masking - Anniversary card
Hi...
friends...
I made this simple card for a friend. I cut out a heart shape from a masking paper and then placed it on a black piece of card stack. Over the masking paper i placed and secured the stencil n applied embossing paste. Removed the stencil n sprinkled rock candy glitter over it, flicked off excess glitter.
Then heat embossed the sentiment on a black strip of card stack n glued it flat on the main panel.
Then heat embossed the sentiment on a black strip of card stack n glued it flat on the main panel.
Stamped the butterfly, fussy cut and applied glossy accent n left it to air dry. Then glued it on the panel. Mounted the main panel on white card base with foam tape.
here is my card


Thank you for visiting..
Subscribe to:
Posts (Atom)